Developing
a Spring Framework MVC application step-by-step
Part 1 – Basic
Application and Environment Setup
Thomas Risberg
July, 2003
(Revised April, 2005)
This is a step-by-step account of how
to develop a web application from scratch using the Spring Framework.
Prerequisites:
-
Java SDK (I am currently using
version 1.4.2)
-
Ant (using version 1.6.2)
-
Apache Tomcat (using version
5.0.28)
You should also be reasonably
comfortable using the above software.
I am not going to cover a lot of
background information or theory in this document -- there are plenty
of books available that covers this in depth. Instead we will dive
right into developing the application.
Step 1 – development directory
We are going to need a place to keep
all the source and other files we will be creating, so I create a
directory that I name 'springapp'. You can place this directory in
your home folder or in some other location. I created mine in a
'projects' directory that I already had in my home directory so the
full path to my directory is '/Users/trisberg/projects/springapp'.
Inside this directory I create a 'src' directory to hold all Java
source files. Then I create another directory that I name 'war'. This
directory will hold everything that should go into the WAR file, that
we would use to deploy our application. All source files other than
Java source, like JSPs and configuration files, belongs in this
directory.
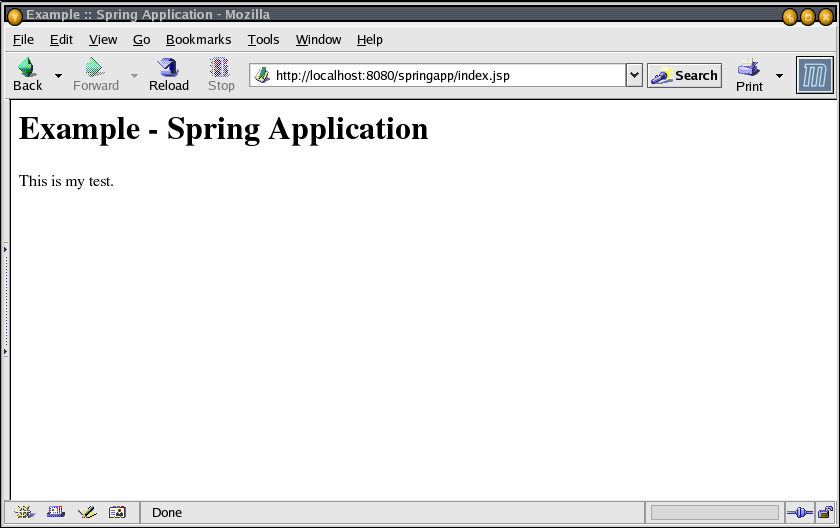
Step 2 – index.jsp
I will start by creating a JSP page
named 'index.jsp' in the war directory. This is the entry point for
our application.
|
springapp/war/index.jsp
|
<html>
<head><title>Example :: Spring Application</title></head>
<body>
<h1>Example - Spring Application</h1>
<p>This is my test.</p>
</body>
</html>
|
Just to have a complete web
application, I create a web.xml in a WEB-INF directory that I create
under the war directory.
|
springapp/war/WEB-INF/web.xml
|
<?xml version="1.0" encoding="UTF-8"?>
<!DOCTYPE web-app PUBLIC '-//Sun Microsystems, Inc.//DTD Web Application 2.3//EN' 'http://java.sun.com/dtd/web-app_2_3.dtd'>

<web-app>

</web-app>
|
Step 3 – deploying the
application to Tomcat
Next, I write an Ant build script that
we are going to use throughout this document. There are tasks for
building and deploying the application. A separate build script
contains the app server specific tasks There are also tasks for
controlling the application under Tomcat.
|
springapp/build.xml
|
<?xml version="1.0"?>

<project name="springapp" basedir="." default="usage">
    <property file="build.properties"/>

    <property name="src.dir" value="src"/>
    <property name="web.dir" value="war"/>
    <property name="build.dir" value="${web.dir}/WEB-INF/classes"/>
    <property name="name" value="springapp"/>

    <path id="master-classpath">
        <fileset dir="${web.dir}/WEB-INF/lib">
            <include name="*.jar"/>
        </fileset>
        <!-- We need the servlet API classes:        -->
        <!--   for Tomcat 4.1 use servlet.jar        -->
        <!--   for Tomcat 5.0 use servlet-api.jar    -->
        <!--   for Other app server - check the docs -->
        <fileset dir="${appserver.home}/common/lib">
            <include name="servlet*.jar"/>
        </fileset>
        <pathelement path="${build.dir}"/>
    </path>

    <target name="usage">
        <echo message=""/>
        <echo message="${name} build file"/>
        <echo message="-----------------------------------"/>
        <echo message=""/>
        <echo message="Available targets are:"/>
        <echo message=""/>
        <echo message="build     --> Build the application"/>
        <echo message="deploy    --> Deploy application as directory"/>
        <echo message="deploywar --> Deploy application as a WAR file"/>
        <echo message="install   --> Install application in Tomcat"/>
        <echo message="reload    --> Reload application in Tomcat"/>
        <echo message="start     --> Start Tomcat application"/>
        <echo message="stop      --> Stop Tomcat application"/>
        <echo message="list      --> List Tomcat applications"/>
        <echo message=""/>
    </target>

    <target name="build" description="Compile main source tree java files">
        <mkdir dir="${build.dir}"/>
        <javac destdir="${build.dir}" target="1.3" debug="true"
               deprecation="false" optimize="false" failonerror="true">
            <src path="${src.dir}"/>
            <classpath refid="master-classpath"/>
        </javac>
    </target>

    <target name="deploy" depends="build" description="Deploy application">
        <copy todir="${deploy.path}/${name}" preservelastmodified="true">
            <fileset dir="${web.dir}">
                <include name="**/*.*"/>
            </fileset>
        </copy>
    </target>

    <target name="deploywar" depends="build" description="Deploy application as a WAR file">
        <war destfile="${name}.war"
             webxml="${web.dir}/WEB-INF/web.xml">
            <fileset dir="${web.dir}">
                <include name="**/*.*"/>
            </fileset>
        </war>
        <copy todir="${deploy.path}" preservelastmodified="true">
            <fileset dir=".">
                <include name="*.war"/>
            </fileset>
        </copy>
    </target>

<!-- ============================================================== -->
<!-- Tomcat tasks - remove these if you don't have Tomcat installed -->
<!-- ============================================================== -->

    <taskdef name="install" classname="org.apache.catalina.ant.InstallTask">
        <classpath>
            <path location="${appserver.home}/server/lib/catalina-ant.jar"/>
        </classpath>
    </taskdef>
    <taskdef name="reload" classname="org.apache.catalina.ant.ReloadTask">
        <classpath>
            <path location="${appserver.home}/server/lib/catalina-ant.jar"/>
        </classpath>
    </taskdef>
    <taskdef name="list" classname="org.apache.catalina.ant.ListTask">
        <classpath>
            <path location="${appserver.home}/server/lib/catalina-ant.jar"/>
        </classpath>
    </taskdef>
    <taskdef name="start" classname="org.apache.catalina.ant.StartTask">
        <classpath>
            <path location="${appserver.home}/server/lib/catalina-ant.jar"/>
        </classpath>
    </taskdef>
    <taskdef name="stop" classname="org.apache.catalina.ant.StopTask">
        <classpath>
            <path location="${appserver.home}/server/lib/catalina-ant.jar"/>
        </classpath>
    </taskdef>

    <target name="install" description="Install application in Tomcat">
        <install url="${tomcat.manager.url}"
                 username="${tomcat.manager.username}"
                 password="${tomcat.manager.password}"
                 path="/${name}"
                 war="${name}"/>
    </target>

    <target name="reload" description="Reload application in Tomcat">
        <reload url="${tomcat.manager.url}"
                 username="${tomcat.manager.username}"
                 password="${tomcat.manager.password}"
                 path="/${name}"/>
    </target>

    <target name="start" description="Start Tomcat application">
        <start url="${tomcat.manager.url}"
                 username="${tomcat.manager.username}"
                 password="${tomcat.manager.password}"
                 path="/${name}"/>
    </target>

    <target name="stop" description="Stop Tomcat application">
        <stop url="${tomcat.manager.url}"
                 username="${tomcat.manager.username}"
                 password="${tomcat.manager.password}"
                 path="/${name}"/>
    </target>

    <target name="list" description="List Tomcat applications">
        <list url="${tomcat.manager.url}"
                 username="${tomcat.manager.username}"
                 password="${tomcat.manager.password}"/>
    </target>

<!-- End Tomcat tasks -->

</project>
|
This script now
contains all the targets that we are going to need to make our
development efforts easier. I am not going to cover this script in
detail since most if not all of it is pretty much standard Ant and
Tomcat stuff. You can just copy the above build file and put it at
the root of your development directory tree. We also need a
build.properties file that you should customize to match your server
installation. This file belongs in the same directory as the
build.xml file.
|
springapp/build.properties
|
# Ant properties for building the springapp

appserver.home=${user.home}/jakarta-tomcat-5.0.28
deploy.path=${appserver.home}/webapps

tomcat.manager.url=http://localhost:8080/manager
tomcat.manager.username=admin
tomcat.manager.password=tomcat
|
If you are on a system where you are
not the owner of the Tomcat install, then the Tomcat owner must
either grant you full access to the webapps directory or the owner
must create a new directory named 'springapp' in the 'webapps'
directory of the Tomcat installation, and also give you full rights
to deploy to this newly created directory. On Linux I run the command
chmod a+rwx springapp
to give everybody full rights to this directory.
If you are using a different web
application server, then you can remove the Tomcat specific tasks at
the end of the build script. You will have to rely on your server's
hot deploy feature, or you will have to stop and start your
application manually.
Now I run Ant to
make sure that everything is working OK. You should have your current
directory set to the 'springapp' directory.
[trisberg@localhost springapp]$ ant
Buildfile: build.xml

usage:

     [echo] springapp build file
     [echo] -----------------------------------

     [echo] Available targets are:

     [echo] build     --> Build the application
     [echo] deploy    --> Deploy application as directory
     [echo] deploywar --> Deploy application as a WAR file
     [echo] install   --> Install application in Tomcat
     [echo] reload    --> Reload application in Tomcat
     [echo] start     --> Start Tomcat application
     [echo] stop      --> Stop Tomcat application
     [echo] list      --> List Tomcat applications


BUILD SUCCESSFUL
Total time: 2 seconds
|
Last action here
is to do the actual deployment. Just run Ant and specify 'deploy' or
'deploywar' as the target.
[trisberg@localhost springapp]$ ant deploy
Buildfile: build.xml

build:
    [mkdir] Created dir: /Users/trisberg/projects/springapp/war/WEB-INF/classes

deploy:
     [copy] Copying 2 files to /Users/trisberg/jakarta-tomcat-5.0.28/webapps/springapp

BUILD SUCCESSFUL
Total time: 2 seconds
|
Step 4 – Test the application
Let's just quickly start Tomcat and
make sure that we can access the application. Use the 'list' task
from our build file to see if Tomcat has picked up the new
application.
[trisberg@localhost springapp]$ ant list
Buildfile: build.xml

list:
     [list] OK - Listed applications for virtual host localhost

     [list] /admin:running:0:/Users/trisberg/jakarta-tomcat-5.0.28/server/webapps/admin

     [list] /webdav:running:0:/Users/trisberg/jakarta-tomcat-5.0.28/webapps/webdav

     [list] /servlets-examples:running:0:/Users/trisberg/jakarta-tomcat-5.0.28/webapps/servlets-examples

     [list] /springapp:running:0:/Users/trisberg/jakarta-tomcat-5.0.28/webapps/springapp

     [list] /jsp-examples:running:0:/Users/trisberg/jakarta-tomcat-5.0.28/webapps/jsp-examples

     [list] /balancer:running:0:balancer

     [list] /tomcat-docs:running:0:/Users/trisberg/jakarta-tomcat-5.0.28/webapps/tomcat-docs

     [list] /:running:0:/Users/trisberg/jakarta-tomcat-5.0.28/webapps/ROOT

     [list] /manager:running:0:/Users/trisberg/jakarta-tomcat-5.0.28/server/webapps/manager


BUILD SUCCESSFUL
Total time: 1 second
|
If it is not listed, use the 'install'
task to get the application installed in Tomcat.
[trisberg@localhost springapp]$ ant install
Buildfile: build.xml

install:
  [install] OK - Installed application at context path /springapp


BUILD SUCCESSFUL
Total time: 2 seconds
|
Now open a browser and browse to
http://localhost:8080/springapp/index.jsp.
Step 5 – Download Spring
distribution
If you have not already downloaded the
Spring Framework Release file, now is the time to do so. I am
currently using 'spring-framework-1.2-with-dependencies.zip' that can
be downloaded
from www.springframework.org/download.html.
I unzipped this file in my home directory. We are going to use
several files from this download later on.
This completes the
setup of the environment that is necessary, and now we can start
actually developing our Spring Framework MVC application.
Step 6 – Modify web.xml in
WEB-INF directory
Go to the 'springapp/war/ WEB-INF'
directory. Modify the minimal 'web.xml' file that we created earlier.
Now we will modify it to suit our needs. We define a
DispatcherServlet that is going to control where all our request are
routed based on information we will enter at a later point. It also
has a standard servlet-mapping entry that maps to the url patterns
that we will be using. I have decided to let any url with an '.htm'
extension be routed to the 'springapp' dispatcher.
|
springapp/war/WEB-INF/web.xml
|
<?xml version="1.0" encoding="UTF-8"?>
<!DOCTYPE web-app PUBLIC '-//Sun Microsystems, Inc.//DTD Web Application 2.3//EN' 'http://java.sun.com/dtd/web-app_2_3.dtd'>

<web-app>

  <servlet>
    <servlet-name>springapp</servlet-name>
    <servlet-class>org.springframework.web.servlet.DispatcherServlet</servlet-class>
    <load-on-startup>1</load-on-startup>
  </servlet>

  <servlet-mapping>
    <servlet-name>springapp</servlet-name>
    <url-pattern>*.htm</url-pattern>
  </servlet-mapping>

  <welcome-file-list>
    <welcome-file>
      index.jsp
    </welcome-file>
  </welcome-file-list>

</web-app>
|
Next, create a file called
'springapp-servlet.xml' in the springapp/war/WEB-INF directory (you
can copy an example of this file from the Spring distributions
sample/skeletons/webapp-minimal directory). This is the file where
definitions used by the DispatcherServlet should be entered. It is
named based on the servlet-name from web.xml with '-servlet'
appended. This is a standard naming convention used in the Spring
Framework. Now, add a bean entry named springappController and make
the class SpringappController. This defines the controller that our
application will be using. We also need to add a url mapping so the
DispatcherServlet knows which controller should be invoked for
different url:s.
|
springapp/war/WEB-INF/springapp-servlet.xml
|
<?xml version="1.0" encoding="UTF-8"?>
<!DOCTYPE beans PUBLIC "-//SPRING//DTD BEAN 2.0//EN" "http://www.springframework.org/dtd/spring-beans-2.0.dtd">

<!--
  - Application context definition for "springapp" DispatcherServlet.
  -->

<beans>
    <bean id="springappController" class="SpringappController"/>

    <bean id="urlMapping" class="org.springframework.web.servlet.handler.SimpleUrlHandlerMapping">
        <property name="mappings">
            <props>
                <prop key="/hello.htm">springappController</prop>
            </props>
        </property>
    </bean>
</beans>
|
Step 7 – Copy jars to
WEB-INF/lib
First create a 'lib' directory in the
'war/WEB-INF' directory. Then, from the Spring distribution, copy
spring.jar (spring-framework-1.2/dist/spring.jar) to the new
war/WEB-INF/lib directory.
Also copy commons-logging jars
to the war/WEB-INF/lib directory
(spring-framework-1.2/lib/jakarta-commons/commons-logging.jar).
We are also going to need a log4j jar.
Copy log4j-1.2.9.jar to the war/WEB-INF/lib directory
(spring-framework-1.2/lib/log4j/log4j-1.2.9.jar).
These jars will be deployed to the server and they are also used
during the build process.
Step 8 – Create your
Controller
Create your Controller – I named
mine SpringappController.java and placed it in the springapp/src
directory.
|
springapp/src/SpringappController.java
|
import org.springframework.web.servlet.mvc.Controller;
import org.springframework.web.servlet.ModelAndView;

import javax.servlet.ServletException;
import javax.servlet.http.HttpServletRequest;
import javax.servlet.http.HttpServletResponse;

import java.io.IOException;

public class SpringappController implements Controller {

    public ModelAndView handleRequest(HttpServletRequest request, HttpServletResponse response)
            throws ServletException, IOException {
        return new ModelAndView("");
    }
}
|
This is as basic a
Controller as you can use. We will be expanding this later on, and we
will also later on extend some provided abstract base
implementations. The Controller “handles” the request and
returns a ModelAndView. We have not yet defined any Views, so right
now there is nothing to do.
Step 9 – Build the Application
Run the 'build' task of the build.xml.
Hopefully the code compiles OK.
[trisberg@localhost springapp]$ ant build
Buildfile: build.xml

build:
    [javac] Compiling 1 source file to /Users/trisberg/projects/springapp/war/WEB-INF/classes

BUILD SUCCESSFUL
Total time: 2 seconds
|
Step 10 – Copy and modify
log4j.properties
The Spring
Framework uses log4j for logging so we have to create a configuration
file for log4j. Copy the log4j.properties from the sample Petclinic
application
(spring-framework-1.2/samples/petclinic/war/WEB-INF/log4j.properties)
to the war/WEB-INF/classes directory (this directory should have been
created in the previous step). Now uncomment or modify the
log4j.rootLogger property and change the name and location of
the logfile that will be written. I decided to have it written to the
same directory as all other Tomcat logs.
|
springapp/war/WEB-INF/classes/log4j.properties
|
# For JBoss: Avoid to setup Log4J outside $JBOSS_HOME/server/default/deploy/log4j.xml!
# For all other servers: Comment out the Log4J listener in web.xml to activate Log4J.
log4j.rootLogger=INFO, stdout, logfile

log4j.appender.stdout=org.apache.log4j.ConsoleAppender
log4j.appender.stdout.layout=org.apache.log4j.PatternLayout
log4j.appender.stdout.layout.ConversionPattern=%d %p [%c] - <%m>%n

log4j.appender.logfile=org.apache.log4j.RollingFileAppender
log4j.appender.logfile.File=/Users/trisberg/jakarta-tomcat-5.0.28/logs/springapp.log
log4j.appender.logfile.MaxFileSize=512KB
# Keep three backup files.
log4j.appender.logfile.MaxBackupIndex=3
# Pattern to output: date priority [category] - message
log4j.appender.logfile.layout=org.apache.log4j.PatternLayout
log4j.appender.logfile.layout.ConversionPattern=%d %p [%c] - %m%n
|
Step 11 – Deploy Application
Run the 'deploy' task and then the
'stop' and 'start' tasks of the build.xml. This will force a reload
of the application. We have to check the Tomcat logs for any
deployment errors – there could be typos in the above xml files
or there could be missing classes or jar files. This is an example of
what it should look like.
(/Users/trisberg/jakarta-tomcat-5.0.28/logs/springapp.log)
2005-04-24 14:58:18,112 INFO [org.springframework.web.servlet.DispatcherServlet] - Initializing servlet 'springapp'
2005-04-24 14:58:18,261 INFO [org.springframework.web.servlet.DispatcherServlet] - FrameworkServlet 'springapp': initialization started
2005-04-24 14:58:18,373 INFO [org.springframework.beans.factory.xml.XmlBeanDefinitionReader] - Loading XML bean definitions from ServletContext resource [/WEB-INF/springapp-servlet.xml]
2005-04-24 14:58:18,498 INFO [org.springframework.web.context.support.XmlWebApplicationContext] - Bean factory for application context [WebApplicationContext for namespace 'springapp-servlet']: org.springframework.beans.factory.support.DefaultListableBeanFactory defining beans [springappController,urlMapping]; root of BeanFactory hierarchy
2005-04-24 14:58:18,505 INFO [org.springframework.web.context.support.XmlWebApplicationContext] - 2 beans defined in application context [WebApplicationContext for namespace 'springapp-servlet']
2005-04-24 14:58:18,523 INFO [org.springframework.core.CollectionFactory] - JDK 1.4+ collections available
2005-04-24 14:58:18,524 INFO [org.springframework.core.CollectionFactory] - Commons Collections 3.x available
2005-04-24 14:58:18,537 INFO [org.springframework.web.context.support.XmlWebApplicationContext] - Unable to locate MessageSource with name 'messageSource': using default [org.springframework.context.support.DelegatingMessageSource@8dacb]
2005-04-24 14:58:18,539 INFO [org.springframework.web.context.support.XmlWebApplicationContext] - Unable to locate ApplicationEventMulticaster with name 'applicationEventMulticaster': using default [org.springframework.context.event.SimpleApplicationEventMulticaster@5674a4]
2005-04-24 14:58:18,549 INFO [org.springframework.ui.context.support.UiApplicationContextUtils] - No ThemeSource found for [WebApplicationContext for namespace 'springapp-servlet']: using ResourceBundleThemeSource
2005-04-24 14:58:18,556 INFO [org.springframework.beans.factory.support.DefaultListableBeanFactory] - Pre-instantiating singletons in factory [org.springframework.beans.factory.support.DefaultListableBeanFactory defining beans [springappController,urlMapping]; root of BeanFactory hierarchy]
2005-04-24 14:58:18,557 INFO [org.springframework.beans.factory.support.DefaultListableBeanFactory] - Creating shared instance of singleton bean 'springappController'
2005-04-24 14:58:18,603 INFO [org.springframework.beans.factory.support.DefaultListableBeanFactory] - Creating shared instance of singleton bean 'urlMapping'
2005-04-24 14:58:18,667 INFO [org.springframework.web.servlet.DispatcherServlet] - Using context class [org.springframework.web.context.support.XmlWebApplicationContext] for servlet 'springapp'
2005-04-24 14:58:18,668 INFO [org.springframework.web.servlet.DispatcherServlet] - Unable to locate MultipartResolver with name 'multipartResolver': no multipart request handling provided
2005-04-24 14:58:18,670 INFO [org.springframework.web.servlet.DispatcherServlet] - Unable to locate LocaleResolver with name 'localeResolver': using default [org.springframework.web.servlet.i18n.AcceptHeaderLocaleResolver@318309]
2005-04-24 14:58:18,675 INFO [org.springframework.web.servlet.DispatcherServlet] - Unable to locate ThemeResolver with name 'themeResolver': using default [org.springframework.web.servlet.theme.FixedThemeResolver@c11e94]
2005-04-24 14:58:18,681 INFO [org.springframework.web.servlet.DispatcherServlet] - No HandlerAdapters found in servlet 'springapp': using default
2005-04-24 14:58:18,700 INFO [org.springframework.web.servlet.DispatcherServlet] - No ViewResolvers found in servlet 'springapp': using default
2005-04-24 14:58:18,700 INFO [org.springframework.web.servlet.DispatcherServlet] - FrameworkServlet 'springapp': initialization completed in 439 ms
2005-04-24 14:58:18,704 INFO [org.springframework.web.servlet.DispatcherServlet] - Servlet 'springapp' configured successfully
|
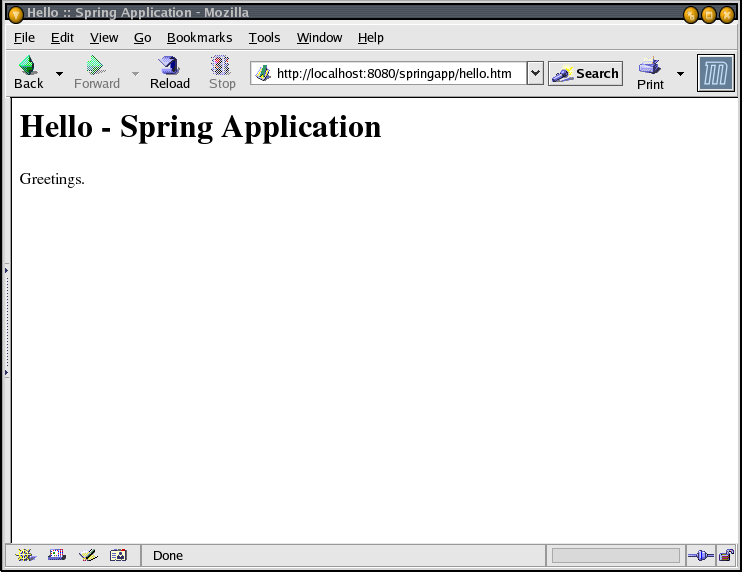
Step 12 – Create a View
Now it is time to create our first
view. I will use a JSP page that I decided to name hello.jsp. I'll
put it in the war directory to begin with.
|
springapp/war/hello.jsp
|
<html>
<head><title>Example :: Spring Application</title></head>
<body>
<h1>Hello - Spring Application</h1>
<p>Greetings.</p>
</body>
</html>
|
Nothing fancy here, but it will do for
now. Next we have to modify the SpringappController to forward to
this view.
|
springapp/src/SpringappController.java
|
import org.springframework.web.servlet.mvc.Controller;
import org.springframework.web.servlet.ModelAndView;

import javax.servlet.ServletException;
import javax.servlet.http.HttpServletRequest;
import javax.servlet.http.HttpServletResponse;

import java.io.IOException;

import org.apache.commons.logging.Log;
import org.apache.commons.logging.LogFactory;

public class SpringappController implements Controller {

    /** Logger for this class and subclasses */
    protected final Log logger = LogFactory.getLog(getClass());

    public ModelAndView handleRequest(HttpServletRequest request, HttpServletResponse response)
            throws ServletException, IOException {

        logger.info("SpringappController - returning hello view");

        return new ModelAndView("hello.jsp");
    }
}
|
While I was
modifying this class, I also added a logger so we can verify that we
actually got here. Changes are highlighted in red.
The model that this class returns is actually resolved via a
ViewResolver. Since we have not specified a specific one, we are
going to get a default one that just forwards to a url matching the
name of the view specified. We will modify this later on.
Now compile and
deploy the application. After instructing Tomcat to stop and then
start the application, everything should get reloaded.
Let's try it in a browser – enter
the url http://localhost:8080/springapp/hello.htm
and we should see the following:
We can also check
the log – I'm only showing the last entries, but we can see
that the controller did get invoked and that it forwarded to the
hello view. (/Users/trisberg/jakarta-tomcat-5.0.28/logs/springapp.log)
2005-04-24 15:01:56,217 INFO [org.springframework.web.servlet.DispatcherServlet] - FrameworkServlet 'springapp': initialization completed in 372 ms
2005-04-24 15:01:56,217 INFO [org.springframework.web.servlet.DispatcherServlet] - Servlet 'springapp' configured successfully
2005-04-24 15:03:57,908 INFO [SpringappController] - SpringappController - returning hello view
|
Summary
Let's take quick look at the parts of
our application that we have created so far.
-
An introduction page index.jsp
that does not do anything useful. It was just used to test our setup.
We will later change this to actually provide a link into our
application.
-
A DispatcherServlet with a
corresponding springapp-servlet.xml configuration file.
-
A controller springappController.java
with limited functionality – it just forwards a ModelAndView to
the ViewResolver. Actually, we only have an empty model so far, but we
will fix this later.
-
A view hello.jsp that again
is extremely basic. But the whole setup works and we are now ready to
add more functionality.
Back
Part 2
–
Developing and Configuring the Application
Copyright © 2003-2005, Thomas
Risberg