Developing
a Spring Framework MVC application step-by-step
Part 3 – Adding
Unit
Tests and a Form to the Application
Thomas Risberg
July, 2003
(Revised April, 2005)
This is Part 3 of a step-by-step
account of how to develop a web application from scratch using the
Spring Framework. In Part 1 (Steps 1 – 19) we configured the
environment and set up a basic application that we will build upon.
Part 2 (Steps 13-19) improved the application in several ways. We are
now going to add some unit tests to the application.
Step 20 – Add unit test for
the SpringappController
Before we create any unit tests, we
want to prepare Ant and our build script to be able to handle this.
Ant has a built in JUnit target, but we need to add junit.jar to
Ant's lib directory. I used the one that came with the Spring
distribution spring-framework-1.2/lib/junit/junit.jar. Just copy
this file to the lib directory in your Ant installation. I also added
the following target to our build script.
    <target name="junit" depends="build" description="Run JUnit Tests">
        <junit printsummary="on"
               fork="false"
               haltonfailure="false"
               failureproperty="tests.failed"
               showoutput="true">
            <classpath refid="master-classpath"/>
            <formatter type="brief" usefile="false"/>

            <batchtest>
                <fileset dir="${build.dir}">
                    <include name="**/Test*.*"/>
                </fileset>
            </batchtest>

        </junit>

        <fail if="tests.failed">
        tests.failed=${tests.failed}
        ***********************************************************
        ***********************************************************
        ****  One or more tests failed!  Check the output ...  ****
        ***********************************************************
        ***********************************************************
        </fail>
    </target>
|
Now I add a new sub-directory in the
src directory that I name tests. This directory will, as you might
have guessed, contain all the unit tests.
After all this, we are ready to start
writing the first unit test. The SpringappController depends on both
the HttpServletRequest, HttpServletResponse and our application
context. Since the controller does not use the request or the
response, we can simply pass in null for these objects. If that was
not the case, we could create some mock objects using EasyMock that
we would pass in during our test. The application context can be
loaded outside of a web server environment using a class that will
load an application context. There are several available, and for the
current task the FileSystemXmlApplicationContext works fine.
|
springapp/src/tests/TestSpringappController.java
|
package tests;

import java.util.Map;
import java.util.List;
import java.io.IOException;
import javax.servlet.http.HttpServletRequest;
import javax.servlet.http.HttpServletResponse;
import javax.servlet.ServletException;
import junit.framework.TestCase;
import org.springframework.context.ApplicationContext;
import org.springframework.context.support.FileSystemXmlApplicationContext;
import org.springframework.web.servlet.ModelAndView;
import web.SpringappController;
import bus.ProductManager;
import bus.Product;

public class TestSpringappController extends TestCase {

    private ApplicationContext ac;

    public void setUp() throws IOException {
        ac = new FileSystemXmlApplicationContext("src/tests/WEB-INF/springapp-servlet.xml");
    }

    public void testHandleRequest() throws ServletException, IOException {
        SpringappController sc = (SpringappController) ac.getBean("springappController");
        ModelAndView mav = sc.handleRequest((HttpServletRequest) null, (HttpServletResponse) null);
        Map m = mav.getModel();
        List pl = (List) ((Map) m.get("model")).get("products");
        Product p1 = (Product) pl.get(0);
        assertEquals("Lamp", p1.getDescription());
        Product p2 = (Product) pl.get(1);
        assertEquals("Table", p2.getDescription());
        Product p3 = (Product) pl.get(2);
        assertEquals("Chair", p3.getDescription());
    }

}
|
The only test is a call to
handleRequest, and we check the products that are returned in the
model. In the setUp method, we load the application context that I
have copied into a WEB-INF directory in the src/tests directory. I
create a copy just so this file will work during tests with a small
set of beans necessary for running the tests. So, copy
springapp/war/WEB-INF/springapp-servlet.xml to
springapp/src/tests/WEB-INF directory. You can then remove the
“messageSource”, "urlMapping" and
"viewResolver" bean entries since they are not needed for this test.
|
springapp/src/tests/WEB-INF/springapp-servlet.xml
|
<?xml version="1.0" encoding="UTF-8"?>
<!DOCTYPE beans PUBLIC "-//SPRING//DTD BEAN 2.0//EN" "http://www.springframework.org/dtd/spring-beans-2.0.dtd">

<!--
  - Application context definition for "springapp" DispatcherServlet.
  -->


<beans>
    <bean id="springappController" class="web.SpringappController">
        <property name="productManager">
            <ref bean="prodMan"/>
        </property>
    </bean>

    <bean id="prodMan" class="bus.ProductManager">
        <property name="products">
            <list>
                <ref bean="product1"/>
                <ref bean="product2"/>
                <ref bean="product3"/>
            </list>
        </property>
    </bean>

    <bean id="product1" class="bus.Product">
        <property name="description"><value>Lamp</value></property>
        <property name="price"><value>5.75</value></property>
    </bean>

    <bean id="product2" class="bus.Product">
        <property name="description"><value>Table</value></property>
        <property name="price"><value>75.25</value></property>
    </bean>

    <bean id="product3" class="bus.Product">
        <property name="description"><value>Chair</value></property>
        <property name="price"><value>22.79</value></property>
    </bean>

</beans>
|
When you run this test, you should see
a lot of log messages from the loading of the application context.
Step 21 – Add unit test and
new functionality for ProductManager
Next I add a test case for the
ProductManager, and I also add a test for a new method to increase
the prices that I am planning on adding to the ProductManager.
|
springapp/src/tests/TestProductManager
.java
|
package tests;

import java.util.List;
import java.util.ArrayList;
import junit.framework.TestCase;
import bus.ProductManager;
import bus.Product;

public class TestProductManager extends TestCase {

    private ProductManager pm;

    public void setUp() {
        pm = new ProductManager();
        Product p = new Product();
        p.setDescription("Chair");
        p.setPrice(new Double("20.50"));
        ArrayList al = new ArrayList();
        al.add(p);
        p = new Product();
        p.setDescription("Table");
        p.setPrice(new Double("150.10"));
        al.add(p);
        pm.setProducts(al);
    }

    public void testGetProducs() {
        List l = pm.getProducts();
        Product p1 = (Product) l.get(0);
        assertEquals("Chair", p1.getDescription());
        Product p2 = (Product) l.get(1);
        assertEquals("Table", p2.getDescription());
    }

    public void testIncreasePrice() {
        pm.increasePrice(10);
        List l = pm.getProducts();
        Product p = (Product) l.get(0);
        assertEquals(new Double("22.55"), p.getPrice());
        p = (Product) l.get(1);
        assertEquals(new Double("165.11"), p.getPrice());
    }

}
|
For this test, there is no need to
create an application context. I just create a couple of products in
the setUp method and add them to the product manager. I add tests for
both getProducts and increasePrice. The increasePrice method is a
cross the board increase based on the percentage passed in to the
method. I modify the ProductManager class to implement this new
method.
|
springapp/src/bus/ProductManager.java
|
package bus;

import java.io.Serializable;
import java.util.ListIterator;
import java.util.List;

public class ProductManager implements Serializable {

    private List products;

    public void setProducts(List p) {
        products = p;
    }

    public List getProducts() {
        return products;
    }

    public void increasePrice(int pct) {
        ListIterator li = products.listIterator();
        while (li.hasNext()) {
            Product p = (Product) li.next();
            double newPrice = p.getPrice().doubleValue() * (100 + pct)/100;
            p.setPrice(new Double(newPrice));
        }

    }

}
|
Next I build and run the tests. As you
can see, this test is just like any regular test – the business
classes don't depend on any of the servlet classes so these classes
are very easy to test.
Step 22 – Adding a form
To provide an interface in the web
application, I add a form that will allow the user to enter a
percentage value. This form uses a tag library named
“spring”
that is provided with the Spring Framework. We have to copy this file
from the Spring distribution
spring-framework-1.2/dist/spring.tld to
the springapp/war/WEB-INF directory. Now we must also add a
<taglib>
entry to web.xml.
|
springapp/war/WEB-INF/web.xml
|
<?xml version="1.0" encoding="UTF-8"?>
<!DOCTYPE web-app PUBLIC '-//Sun Microsystems, Inc.//DTD Web Application 2.3//EN' 'http://java.sun.com/dtd/web-app_2_3.dtd'>

<web-app>

  <servlet>
    <servlet-name>springapp</servlet-name>
    <servlet-class>org.springframework.web.servlet.DispatcherServlet</servlet-class>
    <load-on-startup>1</load-on-startup>
  </servlet>

  <servlet-mapping>
    <servlet-name>springapp</servlet-name>
    <url-pattern>*.htm</url-pattern>
  </servlet-mapping>

  <welcome-file-list>
    <welcome-file>
      index.jsp
    </welcome-file>
  </welcome-file-list>

  <taglib>
    <taglib-uri>/spring</taglib-uri>
    <taglib-location>/WEB-INF/spring.tld</taglib-location>
  </taglib>

</web-app>
|
We also have to declare this taglib in
a page directive in the jsp file. We declare a form the normal way
with a <form> tag and an <input> text field and a submit
button.
|
springapp/war/WEB-INF/jsp/priceincrease.jsp
|
<%@ include file="/WEB-INF/jsp/include.jsp" %>
<%@ taglib prefix="spring" uri="/spring" %>

<html>
<head><title><fmt:message key="title"/></title></head>
<body>
<h1><fmt:message key="priceincrease.heading"/></h1>
<form method="post">
  <table width="95%" bgcolor="f8f8ff" border="0" cellspacing="0" cellpadding="5">
    <tr>
      <td alignment="right" width="20%">Increase (%):</td>
      <spring:bind path="priceIncrease.percentage">
        <td width="20%">
          <input type="text" name="percentage" value="<c:out value="${status.value}"/>">
        </td>
        <td width="60%">
          <font color="red"><c:out value="${status.errorMessage}"/></font>
        </td>
      </spring:bind>
    </tr>
  </table>
  <br>
  <spring:hasBindErrors name="priceIncrease">
    <b>Please fix all errors!</b>
  </spring:hasBindErrors>
  <br><br>
  <input type="submit" alignment="center" value="Execute">
</form>
<a href="<c:url value="hello.htm"/>">Home</a>
</body>
</html>
|
The <spring:bind> tag is used to
bind an <input> form element to a command object
PriceIncrease.java, that is used together with the form. This command
object is later passed in to the validator and if it passes
validation it is passed on to the controller. The
${status.errorMessage} and ${status.value} are special variables
declared by the framework that can be used to display error messages
and the current value of the field.
|
springapp/src/bus/PriceIncrease.java
|
package bus;

import org.apache.commons.logging.Log;
import org.apache.commons.logging.LogFactory;

public class PriceIncrease {

    /** Logger for this class and subclasses */
    protected final Log logger = LogFactory.getLog(getClass());

    private int percentage;

    public void setPercentage(int i) {
        percentage = i;
        logger.info("Percentage set to " + i);
    }

    public int getPercentage() {
        return percentage;
    }

}
|
This is a very simple JavaBean class,
and in our case there is a single property with a getter and setter.
The validator class gets control after the user presses submit. The
values entered in the form will be set on the command object by the
framework. The method validate is called and the command object and
an object to hold any errors are passed in.
|
springapp/src/bus/PriceIncreaseValidator.java
|
package bus;

import java.io.Serializable;
import org.springframework.validation.Validator;
import org.springframework.validation.Errors;

import org.apache.commons.logging.Log;
import org.apache.commons.logging.LogFactory;

public class PriceIncreaseValidator implements Validator {
    private int DEFAULT_MIN_PERCENTAGE = 0;
    private int DEFAULT_MAX_PERCENTAGE = 50;
    private int minPercentage = DEFAULT_MIN_PERCENTAGE;
    private int maxPercentage = DEFAULT_MAX_PERCENTAGE;

    /** Logger for this class and subclasses */
    protected final Log logger = LogFactory.getLog(getClass());

    public boolean supports(Class clazz) {
        return clazz.equals(PriceIncrease.class);
    }

    public void validate(Object obj, Errors errors) {
        PriceIncrease pi = (PriceIncrease) obj;
        if (pi == null) {
            errors.rejectValue("percentage", "error.not-specified", null, "Value required.");
        }
        else {
            logger.info("Validating with " + pi + ": " + pi.getPercentage());
            if (pi.getPercentage() > maxPercentage) {
                errors.rejectValue("percentage", "error.too-high",
                    new Object[] {new Integer(maxPercentage)}, "Value too high.");
            }
            if (pi.getPercentage() <= minPercentage) {
                errors.rejectValue("percentage", "error.too-low",
                    new Object[] {new Integer(minPercentage)}, "Value too low.");
            }
        }
    }

    public void setMinPercentage(int i) {
        minPercentage = i;
    }

    public int getMinPercentage() {
        return minPercentage;
    }

    public void setMaxPercentage(int i) {
        maxPercentage = i;
    }

    public int getMaxPercentage() {
        return maxPercentage;
    }

}
|
Now we need to add an entry in the springapp-servlet.xml file to
define the new form and controller. We define properties for command
object and validator. We also specify two views, one that is used for
the form
and one that we will go to after successful form processing. The latter
which is called the
success view can be of two types. It can be a regular view reference
that is forwarded to
one of our JSP pages. One disadvantage with this approach is, that if
the user refreshes the page,
the form data is submitted again, and you would end up with a double
priceincrease. An alternative way is to use a redirect, where a
response is sent back to the users browser instructing it to redirect
to a new url. The url we use in this case can't be one of our JSP
pages, since they are hidden from direct access. It has to be a url
that is externally reachable. I have choosen to use 'hello.htm' as my
redirect url. This
url maps to the 'hello.jsp' page, so this should work nicely.
|
springapp/war/WEB-INF/springapp-servlet.xml
|
<?xml version="1.0" encoding="UTF-8"?>
<!DOCTYPE beans PUBLIC "-//SPRING//DTD BEAN 2.0//EN"
 "http://www.springframework.org/dtd/spring-beans-2.0.dtd">

<!--
  - Application context definition for "springapp" DispatcherServlet.
  -->

<beans>

    <!--  Controller for the initial "Hello" page -->
    <bean id="springappController" class="web.SpringappController">
        <property name="productManager">
            <ref bean="prodMan"/>
        </property>
    </bean>

    <!--  Validator and Form Controller for the "Price Increase" page -->
    <bean id="priceIncreaseValidator" class="bus.PriceIncreaseValidator"/>
    <bean id="priceIncreaseForm" class="web.PriceIncreaseFormController">
        <property name="sessionForm"><value>true</value></property>
        <property name="commandName"><value>priceIncrease</value></property>
        <property name="commandClass"><value>bus.PriceIncrease</value></property>
        <property name="validator"><ref bean="priceIncreaseValidator"/></property>
        <property name="formView"><value>priceincrease</value></property>
        <property name="successView"><value>hello.htm</value></property>
        <property name="productManager">
            <ref bean="prodMan"/>
        </property>
    </bean>

    <bean id="prodMan" class="bus.ProductManager">
        <property name="products">
            <list>
                <ref bean="product1"/>
                <ref bean="product2"/>
                <ref bean="product3"/>
            </list>
        </property>
    </bean>

    <bean id="product1" class="bus.Product">
        <property name="description"><value>Lamp</value></property>
        <property name="price"><value>5.75</value></property>
    </bean>

    <bean id="product2" class="bus.Product">
        <property name="description"><value>Table</value></property>
        <property name="price"><value>75.25</value></property>
    </bean>

    <bean id="product3" class="bus.Product">
        <property name="description"><value>Chair</value></property>
        <property name="price"><value>22.79</value></property>
    </bean>

    <bean id="messageSource" class="org.springframework.context.support.ResourceBundleMessageSource">
        <property name="basename"><value>messages</value></property>
    </bean>

    <bean id="urlMapping" class="org.springframework.web.servlet.handler.SimpleUrlHandlerMapping">
        <property name="mappings">
            <props>
                <prop key="/hello.htm">springappController</prop>
                <prop key="/priceincrease.htm">priceIncreaseForm</prop>
            </props>
        </property>
    </bean>

    <bean id="viewResolver" class="org.springframework.web.servlet.view.InternalResourceViewResolver">
        <property name="viewClass">
           <value>org.springframework.web.servlet.view.JstlView</value>
        </property>
        <property name="prefix"><value>/WEB-INF/jsp/</value></property>
        <property name="suffix"><value>.jsp</value></property>
    </bean>
</beans>
|
Next, let's take a look at the
controller for this form. The onSubmit method gets control and does
some logging before it calls the increasePrice method on the
ProductManager object. It then returns a ModelAndView passing in a new
instance of a RedirectView created using the url for the successView.
|
springapp/src/web/PriceIncreaseFormController.java
|
package web;

import org.springframework.web.servlet.mvc.SimpleFormController;
import org.springframework.web.servlet.ModelAndView;
import org.springframework.web.servlet.view.RedirectView;

import javax.servlet.ServletException;
import javax.servlet.http.HttpServletRequest;
import javax.servlet.http.HttpServletResponse;

import java.io.IOException;
import java.util.Map;
import java.util.HashMap;

import org.apache.commons.logging.Log;
import org.apache.commons.logging.LogFactory;

import bus.Product;
import bus.ProductManager;
import bus.PriceIncrease;

public class PriceIncreaseFormController extends SimpleFormController {

    /** Logger for this class and subclasses */
    protected final Log logger = LogFactory.getLog(getClass());

    private ProductManager prodMan;

    public ModelAndView onSubmit(Object command)
            throws ServletException {

        int increase = ((PriceIncrease) command).getPercentage();
        logger.info("Increasing prices by " + increase + "%.");

        prodMan.increasePrice(increase);

        String now = (new java.util.Date()).toString();
        logger.info("returning from PriceIncreaseForm view to " + getSuccessView());

        return new ModelAndView(new RedirectView(getSuccessView()));
    }

    protected Object formBackingObject(HttpServletRequest request) throws ServletException {

        PriceIncrease priceIncrease = new PriceIncrease();
        priceIncrease.setPercentage(20);

        return priceIncrease;

    }

    public void setProductManager(ProductManager pm) {
        prodMan = pm;
    }

    public ProductManager getProductManager() {
        return prodMan;
    }

}
|
We are also adding some messages to the
messages.properties resource file.
|
springapp/war/WEB-INF/classes/messages.properties
|
title=SpringApp
heading=Hello :: SpringApp
greeting=Greetings, it is now
priceincrease.heading=Price Increase :: SpringApp
error.not-specified=Percentage not specified!!!
error.too-low=You have to specify a percentage higher than {0}!
error.too-high=Don't be greedy - you can't raise prices by more than {0}%!
required=Entry required.
typeMismatch=Invalid data.
typeMismatch.percentage=That is not a number!!!
|
Finally, we have to provide a link to
the priceincrease page from the hello.jsp.
|
springapp/war/WEB-INF/jsp/hello.jsp
|
<%@ include file="/WEB-INF/jsp/include.jsp" %>

<html>
<head><title><fmt:message key="title"/></title></head>
<body>
<h1><fmt:message key="heading"/></h1>
<p><fmt:message key="greeting"/> <c:out value="${model.now}"/>
</p>
<h3>Products</h3>
<c:forEach items="${model.products}" var="prod">
  <c:out value="${prod.description}"/> <i>$<c:out value="${prod.price}"/></i><br><br>
</c:forEach>
<br>
<a href="<c:url value="priceincrease.htm"/>">Increase Prices</a>
<br>
</body>
</html>
|
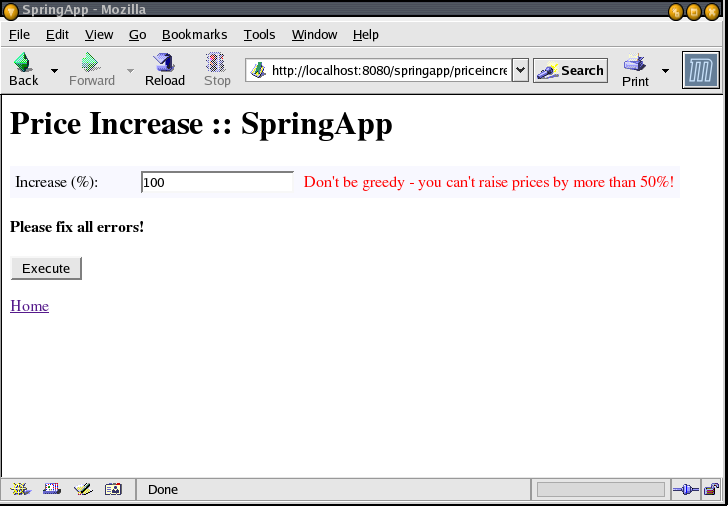
Compile and deploy all this and after
reloading the application we can test it. This is what the form looks
like with errors displayed.
Back
Part 4
–
Implementing Database Persistence
Copyright © 2003-2005, Thomas
Risberg